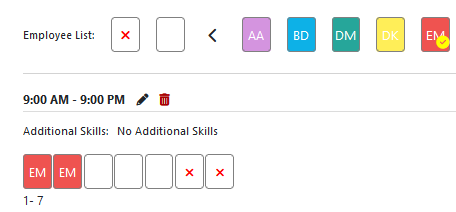
In the central part of the Rotation page, you will see all rotations for the selected spot listed in chronological order.

Each rotation includes:
- Start time and end time
- Category (if exists)
- Additional skills (if exists) – must-have and good-to-have, with must-have skills appearing in bold black letters
- Edit button for modifying the rotation
- Delete button for deleting the rotation
Defining shifts of a Rotation
At the beginning, all shifts within a newly created rotation are indicated as “No Shift”.

There are three options to mark a shift of a rotation:
- No shift
- Unassigned shift
- Shift with a rotation employee
To create a shift without rotation employee, click on the “Unassigned Shift” icon in the employee list and then on the desired shift for the rotation.
To remove a shift, click on the “No Shift” icon in the employee list and then on the shift for the rotation.
To assign a rotation employee to a shift, click on the employee’s icon in the list and then click on the corresponding shift.
To remove the assignment, click on the “Unassigned Shift” icon and then on the corresponding shift.
Editing a Rotation:
To access the details of a rotation, click on the Edit button for that specific rotation. This action will bring up a form where you can make the desired changes. Once you’ve made the necessary adjustments, remember to press “Save” to confirm the modifications.
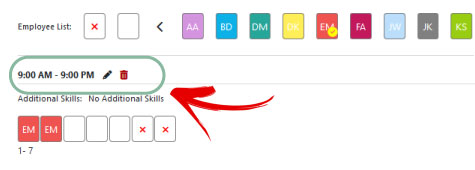
It’s essential to note that editing the rotation won’t impact the shifts created from this rotation previously.
Deleting a Rotation:
To delete a rotation, click on the Edit button for that rotation. Confirm the deletion by responding affirmatively to the confirmation message.


